Room Editor#
A room is the game's location unit: a background image plus every kind of authored
content that can sit on top of it. It's the single tool where nearly every other engine
subsystem intersects — hotspots reuse the same reactions UI as the Reactions Editor, a
room's rules file is what the Cutscene Editor and Puzzle Editor write into, its regions are
what a cutscene's NPCENTER/NPCEXIT steps target, and its background feeds the Scene
Orchestrator and every character placed inside it. It's the largest tool in the suite for
exactly this reason.
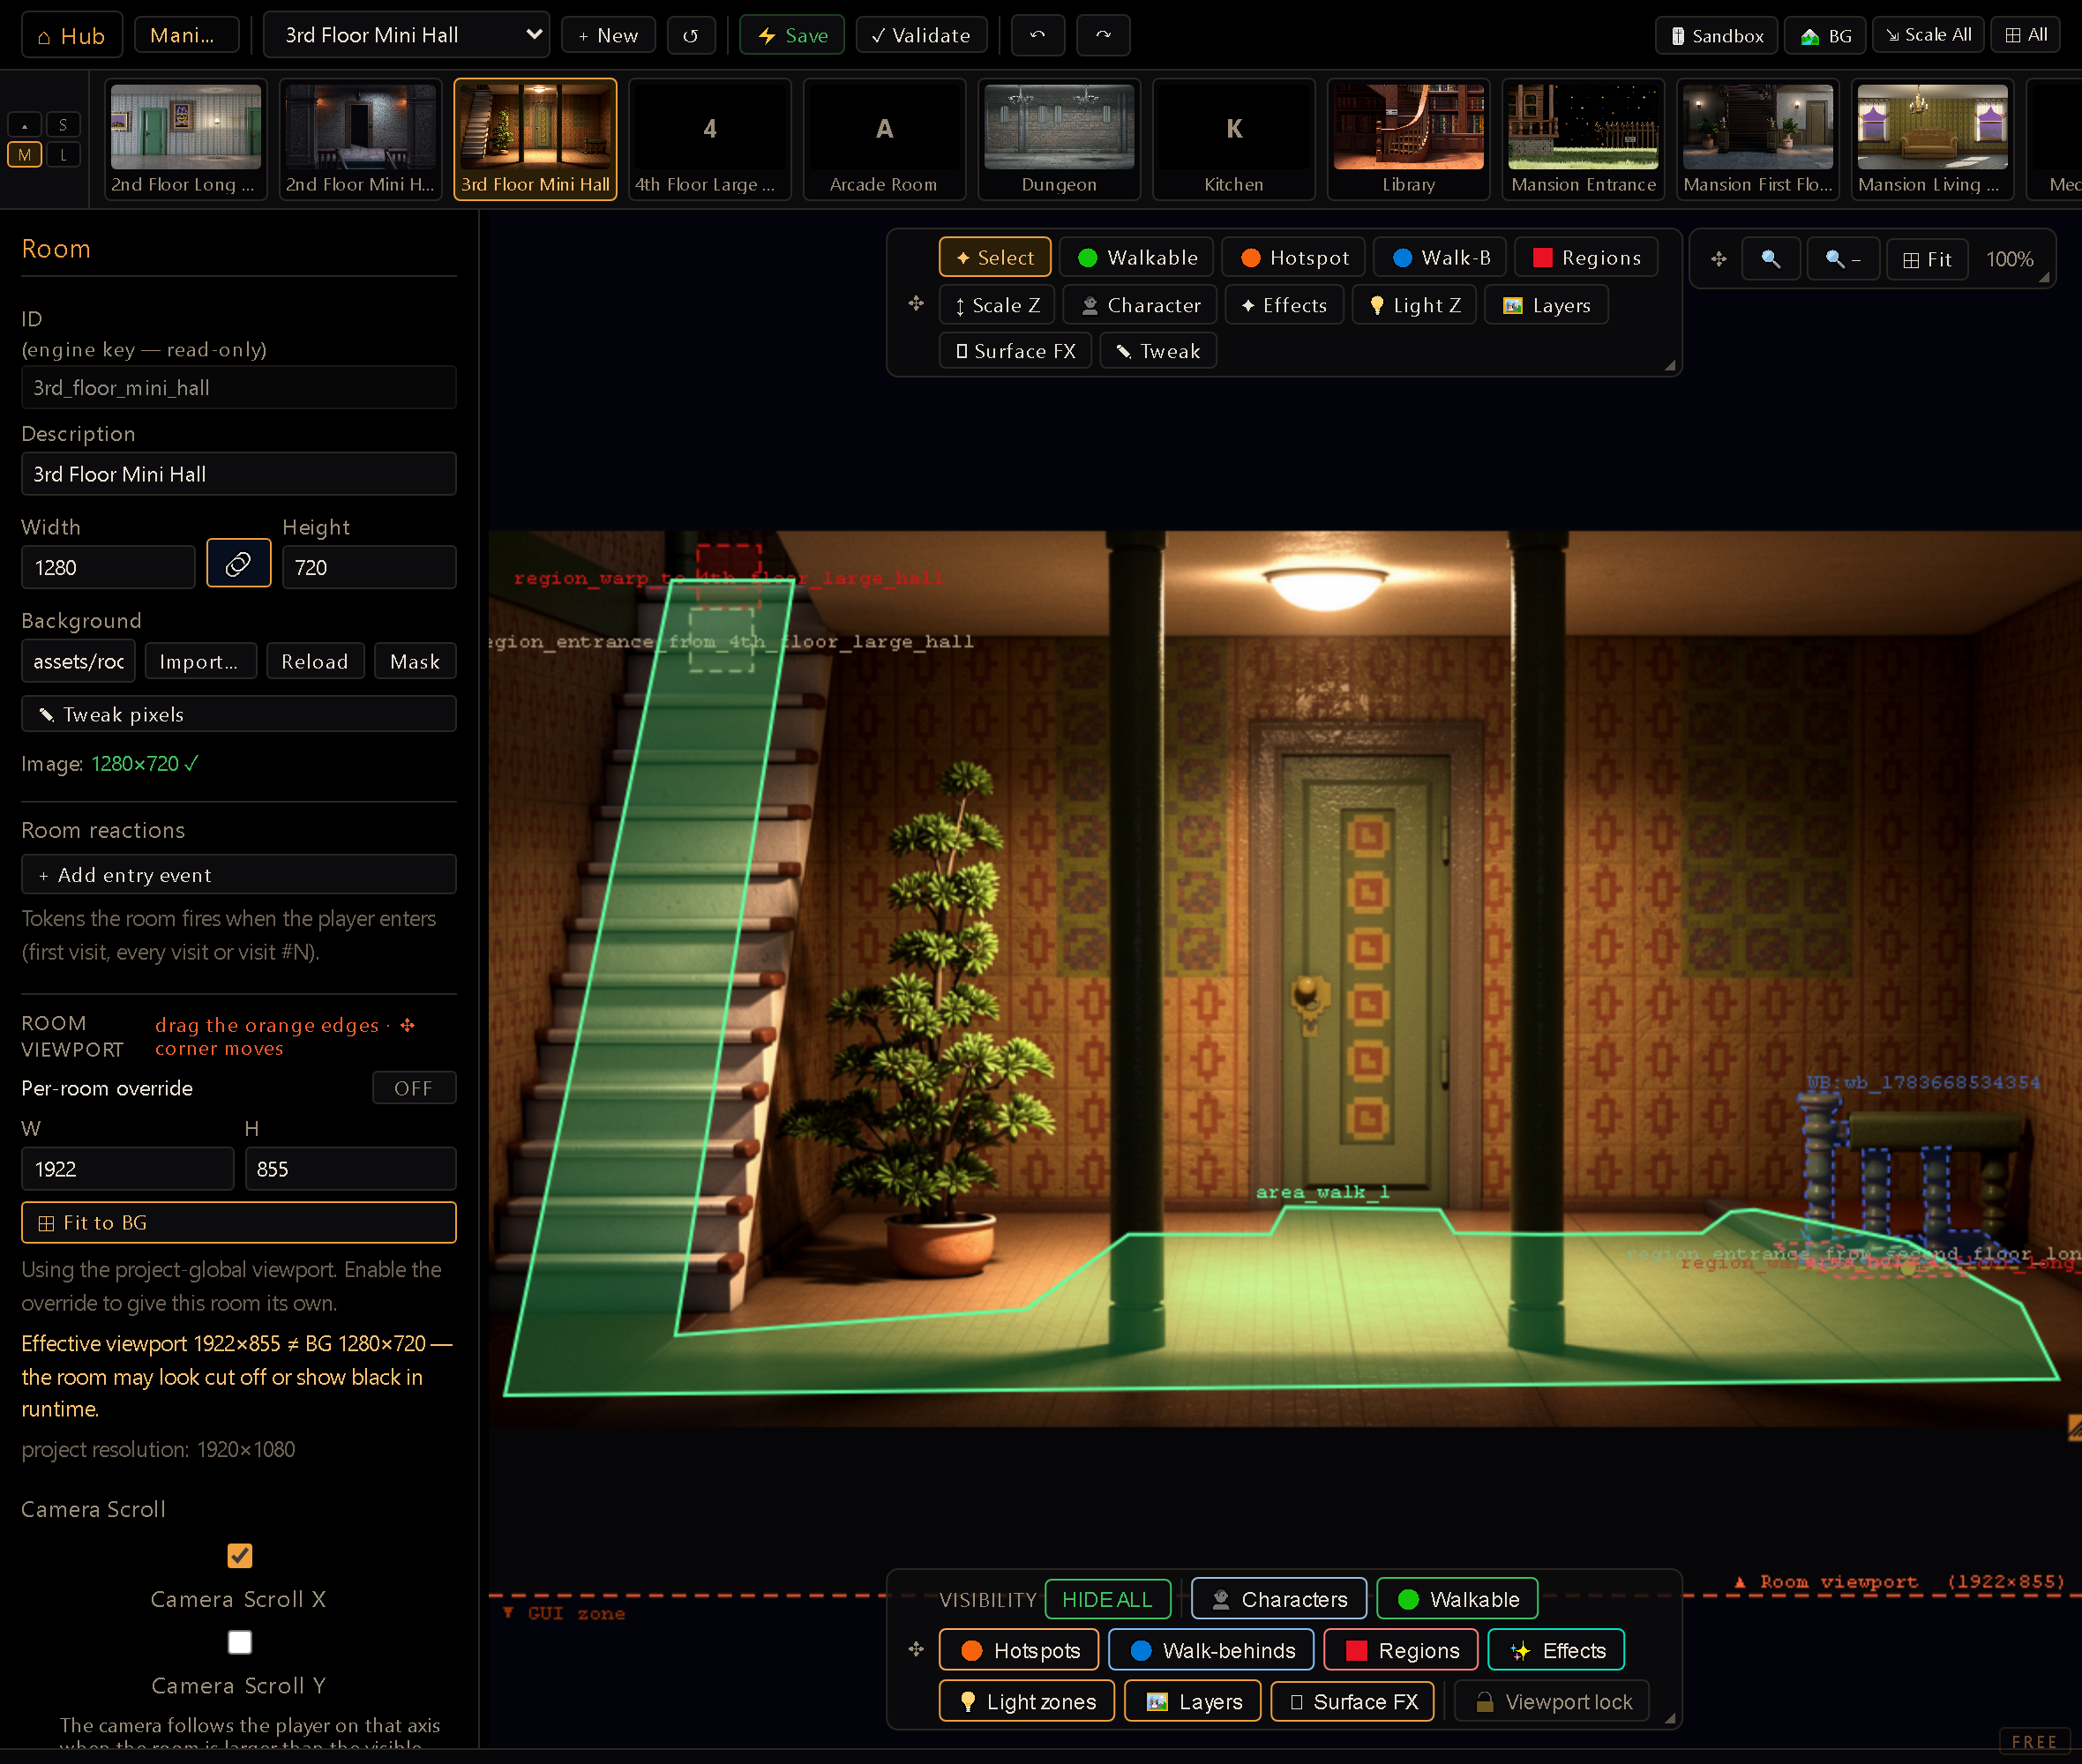
You reach it from the Hub (dev server running). The toolbar has a Room dropdown, +
New, Save (writes the room module), a hidden Export (generated-source escape
hatch, kept for debugging), Validate (summary + wireframe + connection warnings),
Undo/Redo, Scale All, Select All, a 🏞️ BG tool (reposition/resize the
background — G), and a 🎚️ Sandbox preview (both covered below). A strip of room
thumbnails sits under the toolbar for jumping between rooms without going back to the
dropdown; it comes in three sizes and collapses away, and your choice is remembered.
Three floating docks sit over the canvas itself rather than eating toolbar rows: the tools (top-centre by default), the visibility chips (bottom-centre), and the zoom controls (in / out / fit / %, top-right). Each leads with a ✥ grip — click it to unpin the dock, drag it anywhere you like, click again to snap it home — and a ◢ handle at the bottom-right corner sets its width. Position and width are remembered per dock, so the layout you settle on is the one you get next session.
The tools dock switches what clicking the canvas edits: Select, Walkable,
Hotspot, Walk-B (walk-behind), Regions, Scale Z, Character, Effects,
Light Z, Layers, and Surface FX — each with its own keyboard shortcut (W, H,
B, R, Z, C, E, L, P, F). Alongside them, ✎ Tweak is an action rather than
a mode: it opens a one-shot pixel touch-up of whatever is in context — the selected hotspot's
sprite, or the room background. The Layers panel carries the same button for the selected
layer's PNG. The visibility chips hide any layer category for a cleaner
view without leaving your current tool. The sidebar shows properties for whatever's selected;
the canvas is the room itself, panned/zoomed with a contain-fit transform.
Editing a polygon#
Most of what you author in a room is a polygon — walkable areas, hotspots, walk-behinds, regions, light zones, effect areas, and a layer's clip mask all work the same way. Click to place vertices one at a time, then click back on the first one to close the shape. Once it's closed you can reshape it without redrawing:
- Drag a vertex to move it.
- Click an edge to insert a new vertex there and start dragging it immediately.
- Drag from inside the shape to move the whole polygon.
The cursor tells you which of those a click will do before you commit to it — a pointer over a vertex, a copy cursor over an edge, an open hand inside the shape, and a crosshair everywhere else (where a click places a new point instead). That's the same vocabulary in every polygon tool, so the shape you're editing never changes the gestures you use.
Anatomy of a room#
A room descriptor is a plain JS module: an id, a bare description string (see the i18n
note below), a background, and parallel arrays for every subsystem —
hotspots[], walkableAreas[], regions[], lightZones[], layers[], reflections[] +
a single lighting block, partyAnchors[], plus a rules file (shared with the Cutscene
and Puzzle Editors) holding cutscenes/watchers/globalWatchers keyed off this room.
Hotspots#
A hotspot is { id, name, poly, walkTo:{x,y}, defaultVerb, reactions:{...} } — a clickable
polygon plus the point the player character walks to before the reaction fires. Drawing a
hotspot derives that point for you — bottom-center of the shape, a step in front of it
(you stand before the door, not inside the frame), clamped into the room and onto the
walkable floor so what gets written is somewhere a character could actually stand. That
step is sized to your cast, not to a fixed number of pixels: it's a fraction of the
character's on-screen height at that spot, so it reads the same whether your game runs
at 320×200 or 1920×1080, and shortens by itself for a hotspot at the back of a room where
depth scaling makes the character smaller. The
📍 Place button overrides it by hand and leaves the point exactly where you click;
Validate warns when a walk-to ends up outside the room or off the walkable floor (in game
the character snaps to the nearest floor point either way, so they still arrive — just not
where you chose). Beyond the shape, a hotspot carries sprite behavior (visible/enabled toggles, opacity, an optional
dynamic mode that draws it depth-sorted against characters via z/sortY instead of as
flat background art) and three optional behavior cards:
- Animation — wires the hotspot to an object-category anim (idle/frame sequence) instead
of a static sprite. "Instead" is literal, and it has a consequence worth knowing before you
go debugging: once a hotspot is animated, the clip's current frame is what gets drawn, so a
SETFRAMEreaction on that hotspot changes nothing you can see. UseSETANIMFRAME:<n>to move an animated hotspot to a specific frame — the editor warns you if you reach for the wrong one. - Looping audio —
hs.audio = { id, on }for a persistent ambient loop (radio, fountain, machinery); enabling it auto-wires theusereaction to a bareTOGGLEHOTSPOTAUDIOtoken that self-targets the hotspot (rename-proof — it never hardcodes the hotspot id), and it backs off cleanly if you'd already hand-authored ausereaction. - Openable —
hs.openable = { open, closedFrame, openFrame }for a door/container with two frames; enabling it auto-wiresopen/closereactions toSETHOTSPOTOPEN:open/SETHOTSPOTOPEN:closed, same self-targeting, same don't-clobber-hand-authored-reactions rule.
A sprite hotspot's size lives in exactly one place — Sprite size, two boxes in room pixels joined by a 🔗 link, the same bracket the room's own width/height wears. Linked, either box scales the art uniformly. Unlinked, Height stretches or flattens it on its own (×0.05 to ×3 of the natural ratio), which is what you want when a prop must read squatter rather than smaller; and editing Width then leaves that height where you put it instead of dragging it along. The height needs the sprite's own ratio to do its arithmetic, so both it and the 🔗 stay dim until an image has decoded — an invented 1:1 would quietly mean something else the moment the real art landed.
Two buttons sit under the boxes. ⊡ Rect fit is the size's own reset: it snaps both axes
back to the image's natural pixels — one image pixel, one room pixel — and rebuilds the
polygon as that rectangle. ⬡ Trace outline instead walks the alpha channel and hands back
a 24-vertex silhouette. Both measure the image the game actually draws: on a hotspot
carrying both a static icon and an animation, that is the animation's frame, not the icon,
because the animation is what the runtime renders (a paused animation still shows its
current frame — playing controls advancement, not visibility).
A sprite hotspot can also be posed: beyond size and rotation, Sprite distort skews it on either axis (±80°). It's a live transform, not a bake — the PNG on disk is never touched, so you can dial a leaning sign and still undo it by dragging the slider back. Reset distort returns the skews and the corner pin to neutral and deliberately leaves the size alone: undoing a pose should never resize a prop, and ⊡ Rect fit is the size's own reset. A value left at neutral isn't written to the room file at all. The corner handles on the canvas follow the distorted shape, and so does the cursor: the click test samples the sprite where it's actually drawn.
The polygon is still the generous outer bound. Flattening a sprite doesn't shrink the clickable area — a click inside the polygon but outside the sprite still counts, because that's the zone you drew. If you want the hit area to follow a flattened sprite, re-run ⬡ Trace outline afterwards; it traces the distorted silhouette.
Distorting and the ✎ Tweak bake agree. The same skew angles produce the same pose whether you set them here or bake them into the pixels with Tweak, so you can prototype live and bake later without the object shifting.
◳ Pin corners is the last control and the one that works differently. Skew and stretch are a matrix the engine applies live, every frame, for free; a 4-corner pin is perspective — a sign seen from the side, a screen leaning into the wall — and no live matrix can express it. So the button turns on four handles on the canvas instead of adding a slider: drag them, hold ⇧ for a 5% grid, and the sprite leans into depth. Because it is perspective, the engine bakes the result into pixels and caches the bake, so it still costs nothing per frame; what it does cost is that the pin is capped at one sprite-width of travel per corner, which is what keeps the baked bitmap bounded. The pin is stored relative to the sprite's own box, so changing Width later rescales the lean with the art instead of tearing it. The handles are off by default because one of them sits exactly where the resize handle does — turning the mode on is how you say which of the two you meant. Reset distort clears the pin along with the two skews. ⊡ Rect fit keeps it: a pin is the prop's shape, so a fitted box is traced through it rather than flattening it away.
A hotspot with a sprite also carries a Sprite FX panel section — per-hotspot visual
effects rendered by the same applier in game, editor preview and sandbox (WYSIWYG by
construction): Shadow (a 3-state toggle: off, a basic drop shadow with X/Y/blur/color,
or a silhouette shadow — the sprite's own outline flattened onto the floor exactly like
character shadows, rotatable a full 360°), Glow (outer bloom from the sprite's alpha),
Blur, and Stroke (an outline ring traced from the sprite's silhouette). A silhouette
shadow inherits the room's lighting by default — same angle/length/softness as the
character shadows, so every shadow in the room agrees — with an Inherit room light toggle
that materializes explicit per-hotspot values when you want to art-direct one object apart.
All knobs follow the "0 = off" convention and an untouched hotspot serializes byte-identical
(hs.fx is simply absent). Hotspots without a sprite ignore the section — there is nothing
to shade.
A sprite hotspot also offers 🎬 Send to animation, which copies the PNG into an object
animation's own frame folder — the hotspot's sprite is never referenced directly, so
normalizing or tweaking a frame later can't reach back and mutate the hotspot's art. The
picker lists the room's existing object animations to append to, plus + New animation,
which seeds a fresh one from this sprite (id pre-filled <hotspotId>_default — or
_default_2, _3… when that name is already taken, since animation ids are global across
the project and two rooms can hold the same hotspot id; renameable afterwards in the
Animations editor) and assigns it to the hotspot. Assigning warns first:
an animated hotspot stops drawing its static sprite in game, because the animation wins.
Lifting an object out of the background art#
A prop painted into your background can become a hotspot sprite without leaving the editor. Outline it with the hotspot polygon, then press ⧉ Copy to lift that region into the hotspot's own sprite — the background stays untouched — or ✂ Cut to lift it and punch the region out of the background image. Either way the new sprite is pinned to draw exactly where it came from, pixel for pixel, so nothing appears to move at the moment you press it. What you've gained is that the prop is now an object you can move, hide, animate or shade, instead of paint.
Cut is the one that rewrites a file, so it asks first, and the first time you cut a given
room it keeps a pristine copy of the original background under alternates/. The hole it
leaves stays covered by the new sprite until you move or hide the hotspot. The room is saved
for you right after a cut, so the sprite and the hole land together — a reload can never
leave you with one and not the other.
Undo puts the background back too.
Ctrl+Zafter a cut restores the background image and un-wires the sprite in one step;Ctrl+Shift+Zre-applies both. The backup copy is there for going further back than your undo history reaches, not for routine second thoughts.
Paint order is list order. Hotspot sprites are drawn in the order they appear in the
hotspot list — the last one paints on top — and the ▲▼ buttons on each row move a
hotspot through that order (▲ further back, ▼ further front). This is what you reach for
when opening a container reveals something inside it: author the drawer and the key as
usual, SHOWHOTSPOT the key when the drawer opens, and move the key down the list so
it paints over the open-drawer sprite. Note this is a different axis from the dynamic
mode above — z/sortY sort a hotspot against characters by depth, while list order
sorts static hotspot art against other hotspots.
The coloured dot hides and shows a hotspot. Each list row starts with a dot in the hotspot layer's colour, and it dims when that hotspot is hidden. Click it — or focus it and press Enter — to flip the hotspot between visible and hidden without leaving the list; it is a shortcut for the panel's VISIBLE / HIDDEN button and does exactly the same thing, undo included. Handy while you are dressing a room and want a prop out of the way for a moment.
🔒 Lock a hotspot you've finished placing. Stacking hotspots creates a selection problem:
the one on top swallows every click, and reaching the one behind it means shuffling the order
with ▲▼ and putting it back afterwards. The 🔒 button on each list row solves it from the
other end — a locked hotspot becomes transparent to the canvas, so clicks fall straight
through to whatever sits under it. It also can't be dragged, reshaped, resized, rotated or
deleted while locked, and its transform handles stop being drawn. The list row still selects
it normally (otherwise you could never unlock it), and the lock is authoring-only: it's stored
as locked: true in the room and the running game never reads it.
An object the cast walks around: walk-behind or depth-sorted hotspot? Both tools solve the same visual problem from opposite sides, and which one you want depends on where the art lives. If the object is painted into the room background — a column, a counter — it's a walk-behind: trace the polygon over it and put the baseline where the object meets the floor. If the object has its own sprite, and especially if there are several of them (motorcycles parked at different distances, loose barrels), it's a depth-sorted hotspot: turn on Depth (in front / behind) in its panel and each object carries its own knob, instead of one hand-traced polygon per object. With Depth scale on they also shrink with the room's scale zone, which is exactly what you want when they sit at different distances.
The crossing line is Sort Y, and at 0 = auto it is the sprite's foot: the object
covers the character while they walk behind that foot, and drops behind them as soon as they
pass it. Move it by hand only when the art lies about where it rests (a motorcycle with its
shadow painted well below, an object drawn in perspective). Z bias is the tie-break for
when two things share the same Y.
The click follows the paint: when two hotspots overlap, the one you can see on top is the one that receives the click. Transparent sprite pixels still fall through to whatever sits underneath, so a hotspot with a small opaque object on a large transparent canvas doesn't block its neighbours.
Reactions open in a dedicated modal ("Editar reacciones") that reuses
tools/_reactions-ui.js's buildVerbRow — the exact same per-verb rows the Reactions
Editor renders, with typed pickers/message/chain authoring for every verb (the SCUMM
9-verb grid), never a raw text field. This replaced an older .react-text free-text input
that could serialize [object Object] for composite reactions; it edits hs.reactions in
memory and commits through the room editor's own save, no separate round-trip.
Item interactions — "use this key on this hotspot" — get their own button right below,
and their own modal. These are the flat composite keys <verb>_<itemId> that the runtime
resolves directly, and they carry a large share of a game's inventory puzzles, so they are
a first-class entry point rather than a section folded inside the reactions modal. Pick an
item, build its effect chain, done — without switching over to the
Reactions Editor. Each row carries the ⚡ puzzle rule badge at
full parity with the dedicated editor: it reads create or edit depending on whether a
guarded rule already exists for that key, and opens the rules modal stacked on top of the
one you're in.
The two buttons split hs.reactions between them and each counts only its own half, so the
number on each button matches what you'll see inside it. Editing one never disturbs the
other's keys.
A hotspot's behaviour has two homes, and both buttons count both. The reactions above
live in the room file; a puzzle rule lives in the room's rules file instead, and at
runtime the guarded rule is checked first. So a hotspot can be fully wired — opening a
keypad, taking a coin — with every reaction in the room file left blank, which is exactly
what a hotspot authored entirely through the ⚡ badge looks like. Both counts are therefore
the union: a verb counts if it has a reaction or a rule. A composite that exists only as
a rule still gets its row, with its cell reading (no reactions) and its badge in the edit
state — the rule holds the behaviour, and the row is rebuilt from the rules file every time
rather than written back as an empty key.
Every row answers for its own key and nothing else. The plain use row is about
<hotspot>.use; <hotspot>.use_coin is a row in the item-interactions modal, with a badge of
its own. So a hotspot whose only rule is a composite shows the plain verb in the create
state — that verb really has no rule yet — and clicking the badge starts a new rule under the
plain key instead of opening the composite's.
A reaction authored on the walk verb can never fire, and Validate says so. Walking a
character to a hotspot only ever approaches it — _walkAndAct/_walkToNpc in
shell/main.js unconditionally discard the pending action once the verb is walk, whether
the click came from the classic bar or the verb-coin, and setting the hotspot's
Default verb to walk doesn't rescue it either. Because that content can genuinely never
run, Validate flags it in red, checking both homes the resolver reads — the room's own
hotspot.reactions.walk and a guarded <hotspotId>.walk rule the ⚡ modal can still seed —
and names the two moves that actually work: put the chain on another verb, or on a region's
walk-over instead, which is the surface that means "when the player arrives here."
Walkable areas#
walkableAreas are polygons (a room can have more than one, e.g. disconnected floor
patches) defining where a character may walk; core/walkable.js does the actual
point-in-polygon + pathfinding at runtime. Three draw modes build a polygon:
Poly (click to place vertices one at a time), Freehand (hold and drag, sampling
points along the path — walkable-only), and Paint (a brush that fills a bitmap mask;
releasing traces it via marching-squares and simplifies with Douglas-Peucker at a live
tolerance slider). Paint mode is generic across polygon-holding tools (walkable,
walk-behind, region, hotspot, effects), not just walkable areas, and offers a Replace
(mask starts empty) or Mix (mask seeded from the current shape, for touch-up) seed mode.
The Paint pointer has three settings: the Brush lays area down, the Eraser takes it
away, and the Wand flood-selects part of the background by colour. Alt inverts brush
and eraser for as long as you hold it, and the two carry their own sizes — so a broad
lay-down brush and a fine refining eraser coexist without a trip back to the slider.
What the eraser does to the shape it cuts is not a compromise. A stroke that severs an area in two leaves you with two areas: the original keeps its id, its settings and any rules pointing at it, and the second piece becomes a sibling. A dab in the middle leaves a hole — a sibling area marked unwalkable, which is how a pillar in the middle of a floor has always been modelled here. Both fall out of the same stroke, and painting over them again rewrites that same set instead of piling up duplicates. The other polygon tools have no way to express a hole, so there the largest piece still wins — but they now say so rather than dropping it in silence.
In Poly mode a vertex eraser sweeps several vertices out at once, for thinning a boundary that came back denser than you wanted; right-clicking a single vertex still deletes just that one. Neither will take a polygon below three vertices.
A walkable area can also carry holes — an unwalkable gap cut out of the floor, for walking around a table leg or a pillar without needing a second disconnected polygon. Turn an area into a hole and every vertex you drag is kept inside the floor it belongs to: try to pull it past the floor's own edge and it snaps flush against that edge instead, so you can bite right up to the boundary without ever poking a hole outside the walkable shape. Moving the whole hole works the same way — it slides along the floor without letting any part of it slip outside.
A hole is also the cleaner way to block a closed door: lay one over the threshold and switch it off when the door opens, rather than drawing a second walkable patch that has to overlap the first. One floor means one scale authority and no overlap seam to get wrong. A separate small walkable area still earns its keep for genuinely large areas you unlock later — just give it a generous overlap with the floor it joins.
A pure linter (core/walkable_lint.js) runs on load and on save and surfaces malformed
geometry — self-intersections, near-degenerate polygons, disconnected "hole" areas, and a
hole that still ends up poking outside its floor (from reshaping the floor after the hole
was placed, or in a room authored before this constraint existed) — as non-blocking
warnings in a floating panel; it only reports, it never auto-repairs the polygon.
The self-crossing check doesn't only look for the obvious "X": it also flags an outline that touches itself, which is the shape drawing-with-vertex-snap actually produces. Drop a point exactly on another point, or onto an edge you already drew, or double back over a run you just traced, and the area pinches to zero width right there — the two lines never cross, so a crossings-only check can't see it, but a character routed through it walks a 0px gate and the click goes dead. The fix is always the same: re-trace the outline as a simple loop, or nudge the vertex a couple of pixels. Repeating the first point at the end to "close" the area is not a defect — outlines close themselves and the extra point is ignored.
The linter gates "nearby" the same way the running game does — a few times the
character's on-screen walk-height, read from characters.json through the same
core/charScale.js the engine uses — so a warning and the symptom you'd feel while
playing are the same event. It also checks the invariant that actually matters:
every walkable area must be reachable on foot from where the player starts. Floor
you painted but nobody can walk to is flagged even when it looks nowhere near the rest
of the floor, which a "these two nearly touch" check can never see. A hole that seals
an area on purpose — the closed-door pattern above — is not flagged; the check ignores
declared obstacles, so only floor that fails to connect on its own geometry counts.
The panel has three states, not two: analysing, N warnings, and couldn't analyse.
That distinction matters because zero warnings is itself a verdict — it means the room was
checked and is clean, and the panel hides. So a pass that fails says so in its own red chip
(hover it for the underlying reason) instead of returning an empty list that would read as a
clean bill, in the panel and in the save-time note alike. Geometry the linter cannot read at
all — a vertex with a missing or non-numeric x/y, which the editor's own tools can't
produce but a hand-edited or imported room file can — is skipped instead of taking the whole
pass down with it, and is reported as its own warning naming the area or hole, so you always
know what the report doesn't cover.
Regions#
Regions are polygon areas (not points) with an authoritative type:
generic, entrance, or warp — an explicit reg.type wins, and legacy rooms
without one are classified by heuristic (an onWalkOver firing WARPTOROOM: reads as
warp; an id containing "entrance" reads as entrance; everything else is generic), so
older room files keep classifying correctly with zero migration. A region can carry an
onWalkOver reaction, authored through the same shared effects-builder widget used
elsewhere. Entrance regions are what the Cutscene Editor's NPCENTER step and the
room-to-room warp picker both list as valid arrival points — the room picker's right-hand
column filters to zoneType(r) === 'entrance' when you're wiring a cross-room warp or an
NPC's entry point.
Orphaned rule detector#
A room's reactions are keyed by their owner's id (<id>.<verb>) but live in the rules file, so
renaming an id can leave them pointing at something that no longer exists — they simply stop
firing, silently, with nothing in the badges to show it (a badge only ever asks "is there a rule
for this id?", never "does some rule's id still exist?").
Renaming a hotspot now offers to bring its rules along. Save the room after a rename and Ignitor says how many keys still point at the old id and asks before moving them — it never rewrites another editor's file behind your back, and declining simply leaves them orphaned, which is what the strip below is for. Any comment you wrote above those rules travels with them. Rename in several steps before saving and it still reads as one move, from the original id to the last one. Renaming a region doesn't do this yet, so that direction still lands in the strip.
The room panel surfaces whatever is left: a red strip
listing every orphaned rule key, with a button that opens the exact keys in a dialog so you
know what to fix and where. It checks hotspot- and region-shaped keys (<id>.<verb>) against
every id still alive in the room; character reaction keys share the same rules file but are
deliberately left alone, since a character's own rows never go stale this way. The strip draws
nothing at all when the room is clean.
Room entry reactions#
The room itself carries reactions too: room.onEnter, the events that fire when the player
arrives — on the first visit, on every visit, or on a specific visit count — which
is also what the Reactions Editor's Room mode edits. The Select
tool's room panel opens the same authoring surface without switching editors: a third sibling
of the hotspot and region reaction modals, reached through a button that shows the live event
count. Each row is one trigger (the number field only shows for visitCount) plus the same
shared effect-chain editor every other reaction uses. The data is the identical shape
shell/room_enter.js reads, so a room authored from either editor opens the same in the other,
and an event stripped down to zero tokens is dropped on save, same as an empty hotspot reaction.
Unlike hotspots and regions, this button carries no ⚡ puzzle-rule badge — nothing in the
engine currently reads a guarded rule off room entry, so conditional entry logic still belongs to
the Puzzle Editor's Room Watchers.
Light zones#
room.lightZones is an array of { id, poly, brightness, tint?, feather?, enabled?,
brightnessZone? } polygons, decoupled from the walkable area — a room can tint a
sun-patch or darken a corner regardless of where characters can actually stand.
core/light.js's resolveLightAt() picks the zone under a character's feet each frame;
when no zone covers the feet it falls back to the legacy walkableArea brightness/tint the
shell already passed in, so rooms with no light zones at all render exactly as before
(zero migration). brightness runs -100..100 (negative darkens), tint is a hex override
(otherwise the shell defaults to white/black by sign), and feather is a px falloff width
at the zone edge (0 = hard edge).
A zone's enabled flag is authored here but can also be flipped during play: the
LIGHTZONE_ON / LIGHTZONE_OFF tokens switch a zone by id — from this room or from
another one — so a lamp the player turns off actually stops lighting the floor. The switch
is remembered per room and survives both re-entering the room and a save/load, and the
isLightZoneOn condition reads it back. It's the visual twin of WALKABLE_ON / REGION_ON
and moves nothing: a dark zone is still a zone characters can walk through.
Room surface FX#
One room-wide Surface FX tool covers two related but independent things, both driven by
a single light configuration (room.lighting = { mode, angle, len, soft, alpha, offsetX, offsetY }, mode
none/blob/silhouette/both — absent or none means the shell draws nothing, the
zero-delta contract):
- Character shadows — blob or silhouette, cast from that one room light. Every character in the room casts one, NPCs included — it is a property of the room's light, not of who is playable. The shadow anchors itself on the sprite's lowest opaque pixel, so transparent padding baked into a PNG can't detach it from the feet; the Offset X / Offset Y sliders are the escape hatch for art that still disagrees, or for a deliberately offset shadow. They move the shadow in pixels without changing its shape — a negative Y tucks its contact edge under the sprite, which is how you close a seam you can still see; 0 means the shadow starts right at the feet.
- Reflections (
room.reflections[]), four types: puddle (a polygon floor patch with squash + wobble amplitude/speed that reflects the characters; What reflects picks the model — only whoever steps in it, everyone with the reflection following them as they walk away, or a Waterline for a pond seen past its shore), wall-mirror (a rect or free-form poly clip with parallax + a glass-tint slider, for actual mirrors), bg-region (a source rect copied to a dest rect/poly, for cheap background-echo reflections — tick Also reflect the characters and whoever walks over it reflects live on top, like the furniture), and water (one zone that ripples the background already underneath it, reflecting nothing). Each zone also hasalphaand ablendmode. Wall-mirror, bg-region and water can each toggle between a plain rect and a free-form clip polygon — which is what you want for water, since a pond is rarely a rectangle. A character a walk-behind is hiding stops reflecting — anywhere, in every zone that reflects the cast. You get this for free and there is nothing to tick: if the wall that erases the actor sits between them and the camera, their reflection would be a giveaway that someone is standing there. The test is the one the mirror already used — the character's feet inside a repainting walk-behind's polygon, above its baseline — so anormalorlightwalk-behind, which hides nobody, changes nothing.
Water is the one to reach for when you want a pond, a still puddle or a slow river to move without reflecting anything: it redraws the art that is already there, rippling, in place. Draw one zone over the water in your background art, set the ripple's amplitude and speed, and that is the whole setup — there is no source rect to point anywhere, because a water zone samples itself. (Pointing a bg-region at its own dest is the mistake this type exists to make impossible: bg-region flips what it samples, so aiming it at the pond paints the pond upside-down on top of the pond.)
A wall-mirror has two independent depth settings, and they are easy to mistake for one another. One decides who gets reflected; the other decides where the mirror is painted.
Who gets reflected: "Don’t reflect above Y". A wall-mirror reflects every character in the room by default, wherever they stand. When the mirror is really a window — an opening the player can walk behind as well as in front of — turn this on and the zone gets its own reflection plane: a character whose feet are above the line counts as being behind the glass and casts no reflection (and no parallax drift). The line defaults to the bottom edge of the mirror's rect, which is where the glass usually meets the floor; set it by hand when the art disagrees, such as a mirror mounted high on a wall whose floor contact is well below its own rect. Feet exactly on the line count as in front, matching how walk-behind baselines resolve the same tie. The option is off by default, so existing mirrors are unchanged.
Where it is painted: "Depth Y (draw order)". This is the line at which the mirror joins the
character depth-sort. Feet below it pass in front of the reflection; feet above it stay
behind, and the glass covers them. Leave it at 0 and the engine decides: a mirror whose glass
is repainted by an occlude walk-behind is lifted just above that walk-behind's baseline, so the
reflection lands on the repainted wall art instead of being erased by it, and any other mirror
draws early, behind everyone.
That automatic choice is a guess, and it reads some rooms wrong. It associates a mirror with a walk-behind by overlapping boxes, so a porch — where the walk-behind is the railing and the posts in front of the character, not the wall the windows sit in — hands the windows a depth below the walking strip, and the reflection ends up painted over the character's face no matter what else you change. Setting the depth line to something above the strip is the fix, and there is no way to get there with the reflection setting above: that one only decides who reflects.
Below the walk-behind that repaints the glass, the repaint wins. Put the depth line under that baseline and the wall art covers the reflection wherever it crosses. On a porch that is exactly right — the posts are in front of the window. On a mirror hanging on a repainted wall it is the bug the automatic setting exists to avoid, which is why the automatic setting is still the default.
When you set a depth line, the canvas draws it as a dashed reference across the mirror, so you can compare it against the walkable strip at a glance. It is a reference, not a handle: the automatic depth depends on which walk-behind claims the glass, and that lives in the engine, so the editor draws only the line you authored yourself.
Which way the reflection faces. Two more checkboxes, one per axis, and they answer different questions. "Flip L↔R (true mirror)" turns the reflection around left-to-right; uncheck it for a mirror on the back wall, where the reflection should keep the character's own facing instead of inverting nose-to-nose. "Flip ↑↔↓ (front/back)" is the one to reach for when the glass faces the player: a character walking away from the screen is standing face-on to that glass, so the mirror should show their face, and a character facing you should show their back. Leave it unchecked and you get a window — you are looking through the glass at someone on the other side, so their real facing is what you should see.
The second one is not the same kind of switch as the first, even though they sit together. Left and right are the same artwork turned around, so that flip is free. Front and back are different animation frames, so this one goes and fetches the other side — which means the character needs art for both directions. If either side is missing, the reflection quietly stays as it was rather than substituting a sideways pose, so turning it on can look like nothing happened; that is the character's art talking, not the checkbox. Both are off by default for existing mirrors.
Turning a surface on and off during play#
Every reflection zone carries a Reactive visibility condition, and so do the room's character shadows and each hotspot's light source. Leave it on — always — and the surface simply draws, the way it always has. Give it a condition and it only draws while that condition holds — the mirror that stops reflecting once it cracks, the puddle that dries after the rain, the shadows that vanish when the power cuts out, the lamp glow that follows its switch.
It is the same condition builder used by puzzle rules, hotspot reactions,
room layers and room effects — a flag check, a
comparison, or all / any / not nested as deep as you need. The usual switch is a
flag: gate the mirror on mirror_broken, then SETFLAG:mirror_broken from any rule,
reaction, dialogue choice or cutscene step. Because the state lives in the flag it
survives a save and re-entering the room for free, and one flag can drive several
surfaces at once.
The condition is checked every frame, so a surface comes back the moment its condition holds again — there is nothing to re-trigger on room entry.
Hiding shadows means no shadow. Gating character shadows off does not fall back to the engine's default contact ellipse — that fallback only applies to rooms with no
lightingblock at all. Off means off.In the editor it always draws. The canvas shows you the surface whatever your flags say — you have to see what you're authoring. The condition is a runtime gate, not an editor preview switch.
None of this routes through the effect-token manifest — surface FX and lighting are continuous render state tied to the room being open, not one-shot tokens. The visibility condition above is declarative for the same reason: it is re-read every frame rather than flipped by a token.
Placing characters#
The Character tool drops a character at the clicked point and previews it exactly as the
game will draw it standing there. The size is the runtime actor scale (base × depth ×
sizePct × the area's sizeBias) applied to the sprite's own natural pixels — not to a
fixed 512-tall assumption, which described no shipped character and could be off by anything
from 1% to 3× depending on the art. The pose is the one the runtime resolves at rest: the
placement's facing and default anim feed the same core/animations.js cascade the
engine runs (anim → idle → walk → static sprite), including the mirror rule that borrows a
left-facing clip to draw a right-facing one. So the sprite you drag into place, its
selection box, its drop shadow, and its foot anchor are all the frame the player will see.
Party anchors#
room.partyAnchors[] are generic numbered slot markers ({x, y}, no character
hardcoded) — where a committed party (more than one simultaneously-controlled/visible
character) gets stationed when parked in this room. The Character tool has a place
sub-mode (drops a real character) and a partyslot sub-mode (drops one of these anchor
markers instead); at runtime a GUI party-slot button resolves anchor N to whichever
character occupies party slot N. An empty partyAnchors array is dropped before save so
rooms with no stationed slots stay byte-identical to before the feature existed.
Background & parallax layers#
The background is imported through a dedicated modal (pick an image, set/lock
width×height, choose the save path under assets/rooms/, and optionally tick fit the room's
viewport to this BG) with a live preview; there's also an alternate-background A/B slot for
comparing candidate art without touching room.background until you explicitly promote one on
save.
The 🏞️ BG tool (G) repositions and resizes the background image itself: drag to move
it, pull a corner to scale (aspect-locked by default, Alt to scale freely). The whole
transform is transient — it never touches room data until you Apply, which bakes the
result into the PNG at its native pixel dimensions (respecting render.pixelArt for
smoothing). While an un-baked transform is pending, the room's Save warns you first, and
the A/B alternate slots are locked; switching rooms discards the pending transform. It's the
way to nudge or rescale slightly-off background art in place, without round-tripping through an
image editor. On top of the background,
room.layers[] adds parallax depth layers ({ id, src, parallax, z, band?, repeatX, mask? }),
validated live by the pure core/roomLayers.js; the editor self-drives a preview clock to
show scroll/frame-cycling the way the shell would, since the editor itself has no camera to
pan.
A layer's Plane decides which side of the background PNG it falls on, and Z order sorts it against the other layers on that same side. Left at By Z order, the plane comes from the number the way it always has: z below 0 paints over the room art but behind your characters, z above 0 paints in front of them. That pair is measured against the cast, not against the background — which is why no z, however negative, ever put a layer underneath the background art.
Switch Plane to Behind the room background when you want exactly that: a sky, a horizon, a lit window seen from inside. The layer then draws before the background, so it shows only through the background PNG's transparent pixels — which means it needs a hole to show through. If the background is fully opaque the layer is authored correctly and invisible, so the validation strip says so outright and points you at ✂ cutout or ✎ Tweak to cut the opening. A layer that never picks a plane keeps the pose it already had.
The layer list reads in paint order, grouped by plane, top row first — so what you read
downwards is what gets drawn back to front. The ▲▼ buttons on each row move a layer through
that order by trading its Z with its neighbour, and they only ever move it within its own
plane: crossing from one plane to another is a change of Plane or of the sign of z, so at the
edge of a group the button is simply dead. On the backdrop plane the badge shows the layer's
rank inside that plane (⤓backdrop 2/3) rather than a raw z, since a z of -1000 there says
nothing about where the layer lands relative to your cast.
A layer that can never enter the frame is told so. This is the one failure the canvas cannot
show you: the editor draws layers flat at their offset because it has no camera, while the game
draws them at offset − camera × parallax, and the two pictures agree only with the camera at
zero. A layer can be authored correctly, animate correctly in the live preview, and still never
appear in the game because the camera cannot reach far enough. The validation strip names the
band the layer sweeps across the whole pan, the band the frame occupies, and — the actionable
part — the range of offsets that would work: one for "shows at some point", one for "stays
visible for the whole pan". Repeating layers are exempt, since tiling covers the band anyway.
✎ Tweak sits next to the layer's image field and opens that PNG in the pixel editor — the same one-shot touch-up the hotspot sprite and the room background get. What it opens depends on how the layer sources its art: a static or scrolling layer is one file and opens straight away; a sprite sheet is also one file, but you're editing every frame at once, and the modal title says so. A layer built from a PNG sequence has no single file, so it asks first — it tells you how many frames there are and that only the first one gets touched, which is a change you'd see in a paused preview and not in the animation. Frame sequences are better edited in the animations editor. The button is off entirely until the layer has an image.
Room viewport#
A room's viewport is the window the camera shows. By default a room uses the project-global viewport (the shared resolution and letterbox setup); a per-room override lets one room carry its own, saved with the room. The ROOM VIEWPORT section is where you set it — turn the override on, then drag the orange guide's edges to size the window (the ✥ corner moves it). A Centered (letterbox) option drops the origin and lets the window auto-centre at runtime within the project viewport, meant for rooms that fit inside the window. The guide can be locked from the visibility bar so you don't nudge it by accident.
Origin X / Y is the room point the window's top-left corner looks at — the camera origin. It
is what lets you frame a band out of the middle of a big background without cropping the PNG:
drag the ✥ corner over the art until the guide sits on the part you want, and the game starts its
camera there. On a room that scrolls (the Camera Scroll X/Y flags), the origin is where the pan
begins rather than a fixed frame. Everything outside the guide is shaded hard, because that is
background the player will never see; the origin also rides in the guide's label as @ x,y.
Authored coordinates — hotspots, walkable areas, regions — stay in room space and do not move.
⊞ Fit to BG sizes the viewport to the room's background in one click — handy when a room's art isn't the project's resolution. The Import BG modal offers the same as a checkbox, and it defaults to on precisely when the imported art's dimensions don't match the current effective viewport, so a mismatch corrects itself as you import; the Viewport section flags that same mismatch with an amber highlight when the effective window doesn't match the room.
Validate checks reachability against that window. The shading tells you where the dead area is; the validator tells you when it costs you something. A room taller (or wider) than its window with that axis's Camera Scroll off can never show the far end — a 1024px-tall room in a 748px window hides its bottom 276px for good, which is exactly where a floor tends to get painted. Validate reports the band with both ways out (turn the axis's scroll on, or size the room to the window), and escalates to a red finding when a walkable area, a hotspot or a placed character sits entirely inside the dead band: content the player can't see and can't reach. Partial overlap is left alone — a floor that runs off the bottom edge is a normal authoring choice — and a band of only a few pixels is treated as background rounding, so the check stays quiet on rooms that are merely a hair taller than their window.
Ambient sound#
A room can carry one looping ambience — rain outside the window, a fridge hum, night crickets.
Pick the file from assets/audio/ambience/ and the options below it decide how it plays:
- Offset (s) — where playback starts the first time, in seconds into the file.
- Loop start (s) — where it jumps back to when it loops, so an intro that should only be heard once stays out of the loop.
- Loop — off makes it a one-shot instead of a bed.
Both fields are positions inside the file, so the panel prints the chosen file's Duration above them, and warns when an offset or loop start lands past the end — a value past the end plays silence, which is otherwise indistinguishable from a broken path.
Room description#
room.description is still authored as a bare string, not a lid — the content-i18n
monolingual-string migration (core/strings.js) hasn't reached room names/descriptions yet
in this editor. It's used as the room's display name in pickers and the validator when set,
falling back to the raw id.
Previewing the room like the game#
The 🎚️ Sandbox button composes the current room exactly as the shipped game would draw
it: the room clipped 1:1 into the real room viewport (camera at the origin), with the project's
actual main GUI painted on top through the same computeLayout() / drawGui() the engine
runs at runtime — using the booted project / strings / characters / GUIs registries, not a
mock-up. It's the one place in the editor that shows the background, characters, hotspots, and
the HUD composited together at the project's real resolution, instead of the editor's own
flat overlay. Toggle GUI / Characters / Hotspots / Areas / FX / Walk-behinds / Layers / Light on
and off with an immediate repaint, and drag a placed character to check framing — the drag is
sandbox-local, so it never moves anything in the actual room. The sandbox reseeds whenever you
switch rooms.
FX draws the room's effects through the same dispatch the frame runs: the behind layer under the characters, the in front layer over them, and a depth-mode effect at its own place in the Y sort — so this is where you check a depth line against your cast, with one character passing in front of the effect and another behind it in the same picture. The room editor's own Live Preview animates an effect on its own; the sandbox is where you see it against the people who have to walk around it.
Hotspots paints hotspot art, and it honours depth: one with Depth (in front / behind) on
joins the same Y sort as the characters, at its foot (or at its sortY if you pinned one), while
every other hotspot stays in the usual fixed layer behind the whole cast. This is where you test
the parked motorcycles before touching the game.
Walk-behinds repaints the background through each walk-behind polygon at its own place in the same sort, so a character standing above a baseline is actually occluded by the pillar or the counter instead of walking over it. All three modes behave as they do in game: occlude repaints, light washes its tint over whoever is behind it, and normal only affects ordering. Drag a character up and down past a baseline here and you can see the exact frame where it goes behind.
Layers draws the room's parallax layers in all three bands — a layer with z below 0 goes behind your characters, one with z above 0 paints over them, and one on the Behind the room background plane goes under the room art entirely — and the first two are the thing the Layers tool's own preview can't show you, since it has no cast to be in front of. Light adds the room's light zones, the feathered floor wash, in its place under the characters. A layer with a visibility condition is drawn here whatever your flags say, the same as in the editing view: the preview is for seeing the layer, not for simulating the playthrough.
Note that both follow the room's own switches — a room whose layers are turned off at runtime, or a light zone with no feather, draws nothing here either, because that is what the game does with it.
Workflow#
- Pick a Room from the dropdown, or + New. The size it offers is one screen of this project's playable area — the room viewport when the game reserves a GUI strip, the full resolution when it doesn't — so a room you accept as-is is entirely visible and Validate stays quiet about it. (It used to propose a fixed 1512 × 1008, which at the default 1280×1024 was both wider than the screen and 260 px into the band the camera can never reach: a default that tripped the editor's own validator.) The blueprint designer sizes its stubs from the same answer.
- Import a background if the room doesn't have one yet.
- Switch tools to author each layer: draw the Walkable area (Poly, Freehand, or Paint), place Hotspots and open their reactions modal, add Regions (typing entrances so cutscenes/warps can target them), tune Light Z zones, set the room's single Surface FX light plus any reflections, drop Characters and party anchor slots, and stack parallax Layers.
- Keep an eye on the walkable linter panel as you draw — it flags self-intersections and disconnected islands without blocking you.
- Validate before considering the room done — it renders a wireframe summary, checks
cross-room connections (entrances/warps), and flags anything authored outside the
visible window (see below). Its Connects to list finds a room's exits wherever they
are authored — a warp region, a hotspot reaction, the room's
onEnter, a watcher or a cutscene in the rules file — and names the surface each one hangs off, so "this room leads nowhere" only ever appears when it genuinely does. - Save. Undo/redo covers the session (10-deep in-memory stack); it does not persist across reloads.
The Paint brush's bitmap mask is never serialized and undo does not restore it. Only the traced-and-simplified polygon is part of room data; the mask itself is a transient
{ canvas, mctx, idx, w, h }scratch object. Undo/redo restores the polygon correctly, but it clears the paint overlay and rebuilds a fresh mask from whatever polygon you landed on — so a half-finished brush stroke has no "undo the stroke" step. Finish and release a paint stroke (letting it trace into the polygon) before triggering undo, or the in-progress paint visualization simply disappears without touching the actual saved shape.