Anim Editor#
The Anim Editor authors every frame-by-frame animation in the engine — a character's walk
cycle, an object or hotspot's idle loop, a room's parallax-layer frame sequence, or a GUI widget's
linked clip. An animation is a descriptor: { loop, next, pivotX, pivotY, dirs }, keyed by a
stable id in the project's animations.json and looked up at runtime through
core/animations.js's getAnim(). There's no hand-coded playback logic per clip — the editor only
ever edits data; frame advancement is one shared pure function (tickAnim()) that every category
runs through identically.
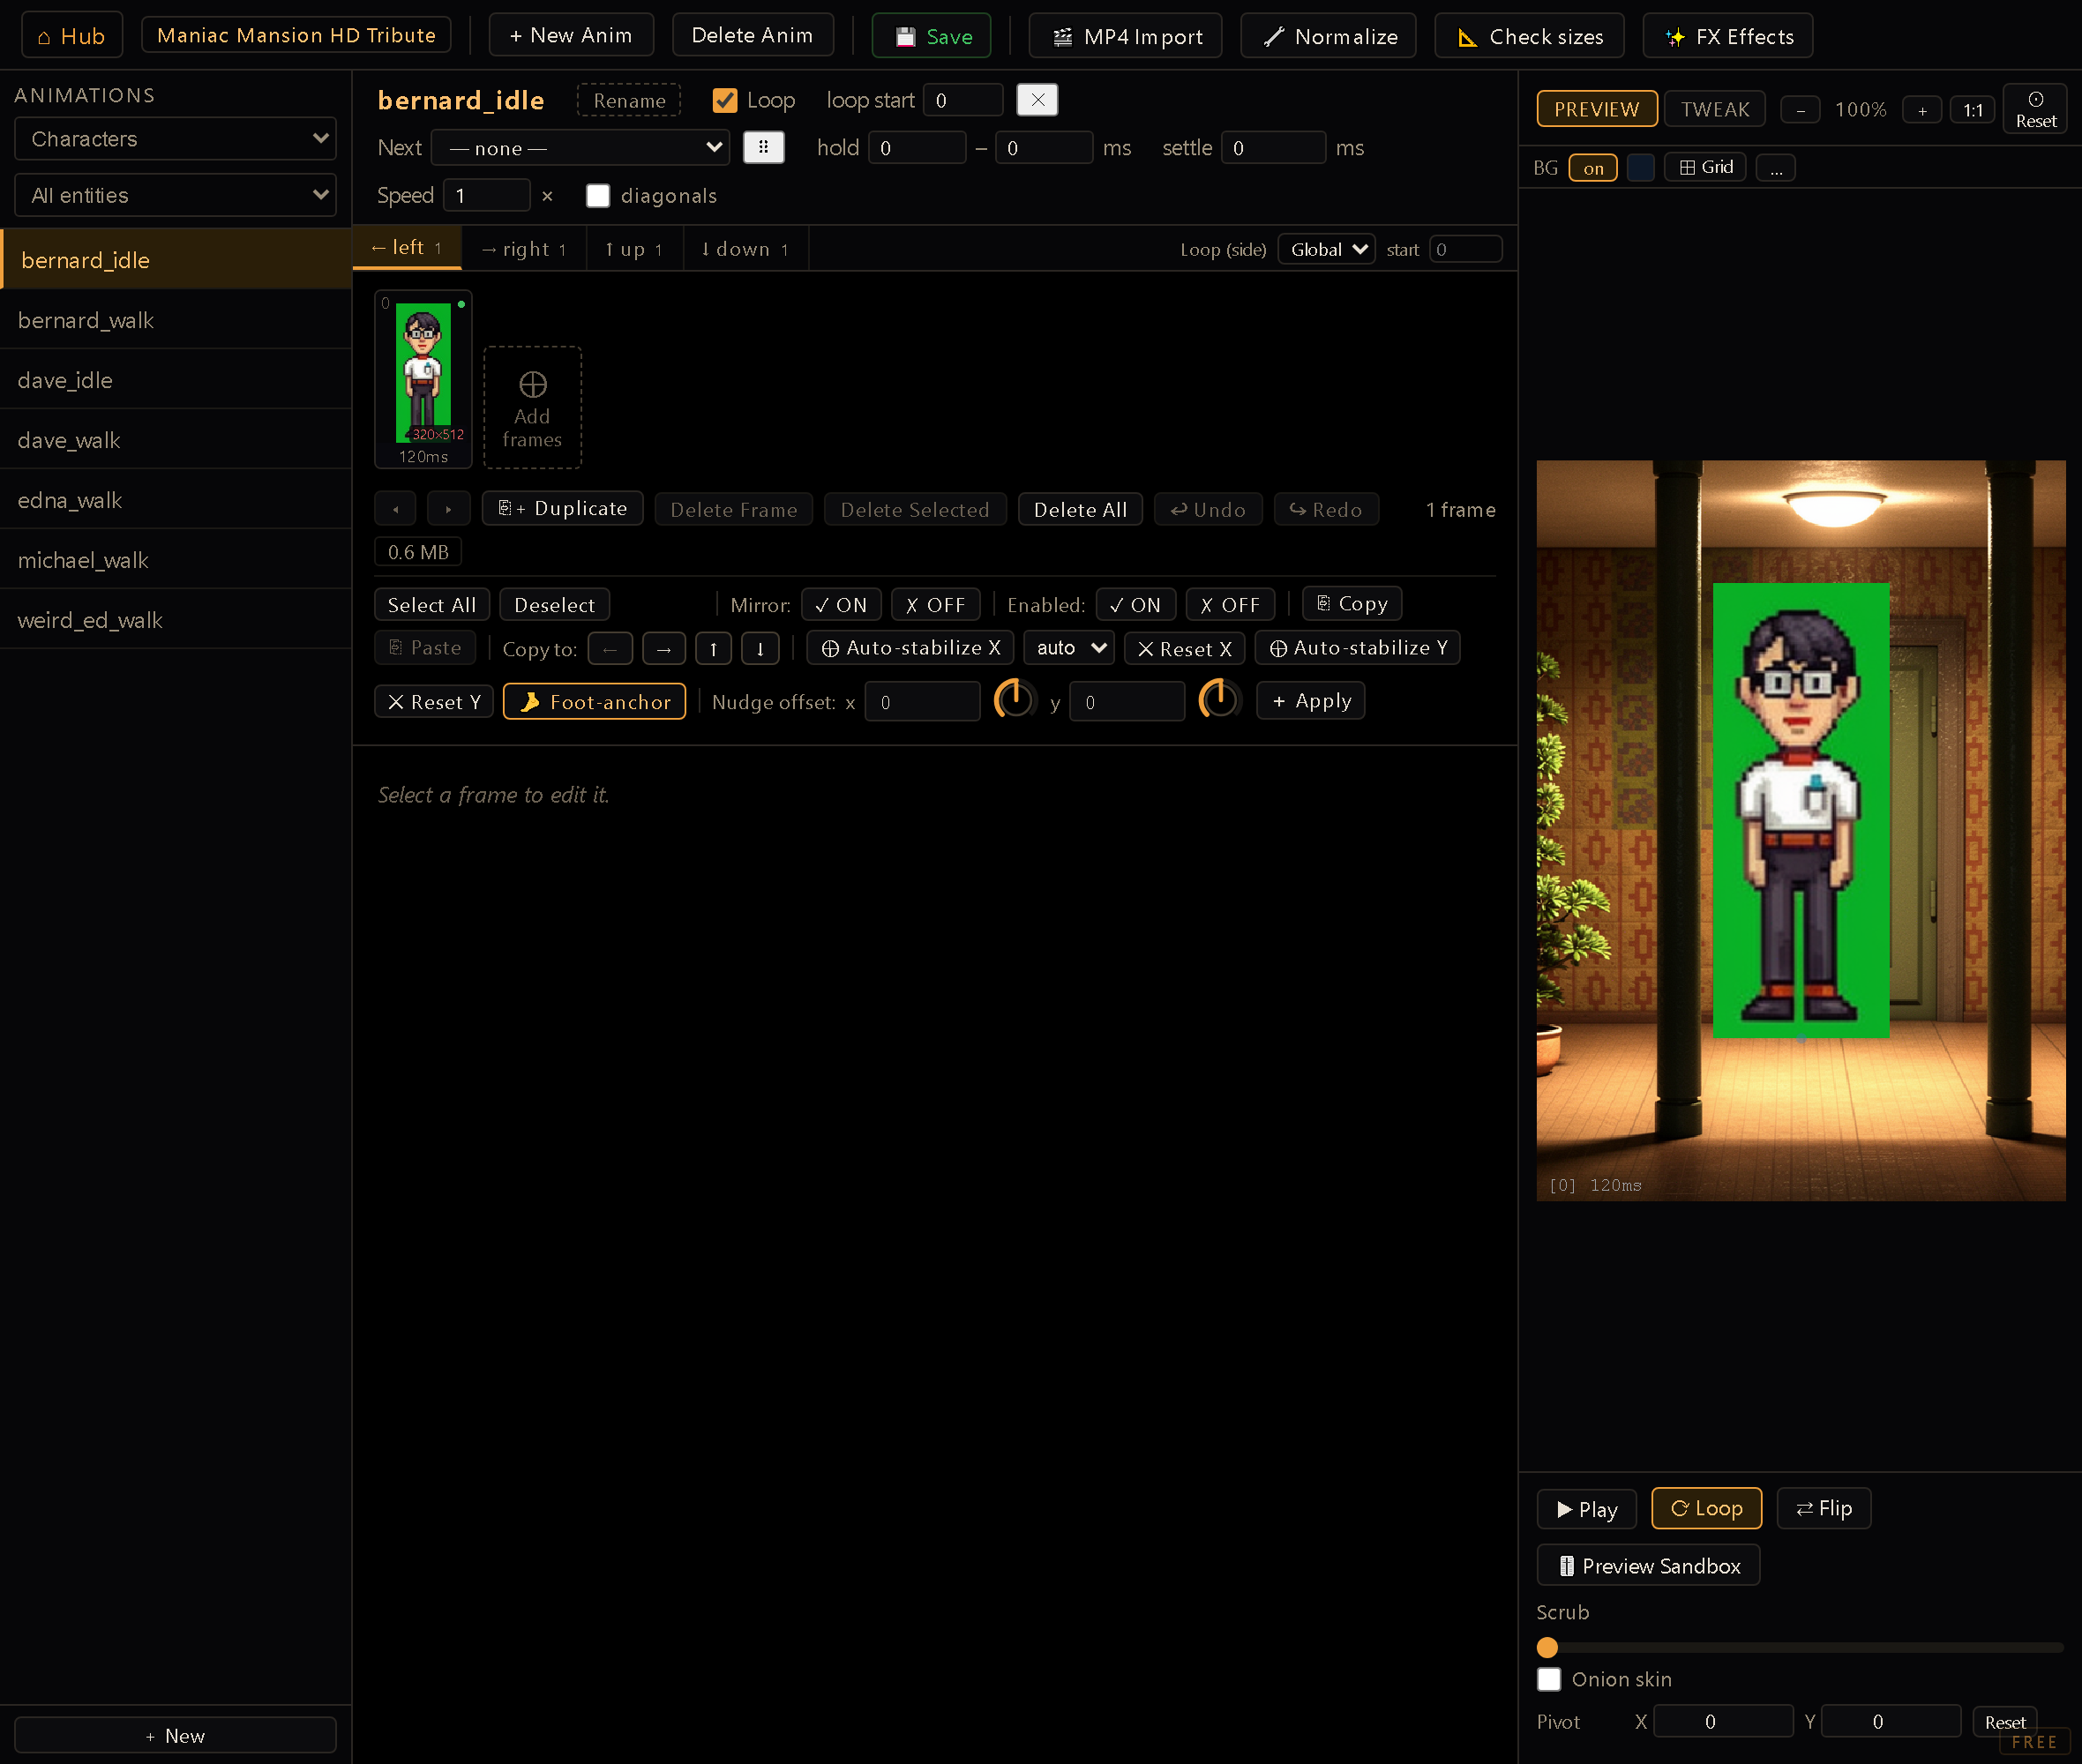
You reach it from the Hub (dev server running). The left rail lists animations, filterable by category (Characters / Hotspots-Objects / Rooms / Inventory items / GUIs) and, within a category, by entity. The center work area has the flags bar, direction tabs, frame timeline, and per-frame inspector; the right-hand preview panel plays the clip live.
Routine feedback — "12 frame(s) deleted", "copied", a nudge applied — arrives as a toast in the bottom-right corner and fades on its own; a burst of them rewrites one toast instead of stacking. Errors are the exception: they stay until you click them away.
Categories and keying#
- Character — walk/idle/blink/talk clips, keyed
<charId>_<type>(e.g.alex_walk,alex_idle). New Anim for this category never lets you type the key directly: you pick the character from a dropdown and a type (WALK / IDLE / BLINK / TALK / OTHER for a custom suffix), and the editor composes the id itself — the same anti-typo discipline as every other autowired picker in the suite.resolveAnimDef()(incore/animations.js) is what actually picks the record at runtime, with a cascade if the exact clip is missing:idlenever substitutes anything (a missing idle draws a static sprite);walkfalls back toidle; anything else falls back toidlethenwalk. That one answer decides both halves — the frames you see and theloop/loopStart/speed/nextthat drive them — so a clip can never play with another clip's loop settings. Worth knowing when you author a character with a walk cycle but no idle: at rest they draw their static sprite and take no loop parameters at all, rather than borrowing the walk clip's. - Hotspot/Object — a single non-directional
stateslot (no left/right/up/down split), used for a hotspot's linked idle/frame-sequence animation (the Room Editor's hotspot Animation card wires one of these in). The card is the default, not the last word: an interaction can swap a prop onto a different clip at runtime withSTARTANIM:<hotspot>|<clip>, and the clip picker there lists exactly the Hotspot/Object and Room animations you author here — by their full id, since these categories aren't entity-prefixed the way character clips are. - Room — parallax-layer frame sequences (
room.layers[]), also a singlestateslot. Like the GUI category, these resolve at runtime from the registry (animations.json) by id — the frame paths baked intoroom.layers[].anim.srcsare just a fallback snapshot, used only when the registry has no matching record. A folder guard keeps ids room-local: if a same-named record belongs to a different room, the layer falls back to its own baked snapshot rather than borrowing the wrong frames. - Inventory item — a single sprite path per item, no
dirsstructure. - GUI — keyed
<guiId>_<animName>, non-directional, saved underassets/guis/<guiId>/animations/<animName>/. This is the category the GUI Editor's doc references: a widget (sprite, button, or panel) can link one of these, and the linked clip's current frame overrides the widget's static PNG at draw time.
Every category shares one shape, and the engine only reads that one: frames live under dirs —
dirs.state for the non-directional categories, dirs.left / right / up / down for
characters. A record hand-edited into any other shape (frames at the top level, an fps field
instead of per-frame ms) is not an error the editor can make, but it is one a hand-edited
animations.json can: the game boots, the clip simply never plays. Since the engine can't guess
what you meant, it says so at boot — the browser console gets one [ignitor] animations.json: "<id>"
has no "dirs" map line per unplayable record, listing the keys the record does have. If an
animation you authored elsewhere refuses to play, that line is the first place to look.
And when nothing resolves at all — no clip, and the character has no spriteLeft either — the actor
draws as the engine's magenta no art: <charId> placeholder box. That box is the honest answer;
it means the character has no art, not that a file failed to load.
Frame authoring#
Frames are added to the timeline three ways: dropping/browsing images directly onto the drop zone,
duplicating an existing frame as an independent copy for per-frame tweaking, or the MP4 Import
panel — a chroma-key pipeline (auto/magenta/black/green/custom-hex, with edge-key cleanup and a
tolerance slider) that runs an ffmpeg-backed job through the /import-video endpoint, distributing
N frames evenly across the source video from a configurable start offset. Character imports anchor
frames to a feet-aligned canvas by default (walk cycles work best); object/room/item imports can
keep the MP4's native frame size instead. Whatever art you bring in is re-encoded to PNG on the
way in, so a slot never ends up with a .jpg sitting beside the .png it was meant to replace —
the frame tooling works in PNGs, and a stray other-format file would be invisible to it.
There's also a Normalize panel for batch-fixing frame canvas size/anchoring after the fact, with a dry-run preview and its own undo. Point it at the whole direction or just your selection, and leave Respect normalized ticked to skip frames already sitting exactly on the target canvas — untick it to force a full re-run, say after changing the character height at the same canvas size. When a batch mixes frames of different source sizes, it groups them by size and computes a shared bounding box per group, so one oversized frame among thirty can't drag the whole character's scale down with it.
The size-class presets are the guidance — they're derived from your project's logical height, so a character reads the same size at any resolution — but Custom is genuinely custom: the sliders span 2–4096 in every category, which is what lets you normalize onto the native size of the footage you imported instead of down to a preset. If you take a character canvas past your project's logical height, the panel says so, because the engine draws an actor at its sprite's native height: that character will stand taller than the screen. It's a warning, not a limit — a giant is a legitimate thing to author.
Frame sizes are checked for you. Each thumbnail carries a W×H badge in its corner: green when the frame matches the rest of its animation, red when it deviates, with the detail in a tooltip. 📐 Validate sizes scans the whole loaded animation — every direction at once — and lists the frames that are out of norm (direction, index, size, file). "Normal" here means this animation's own most common frame size, not a fixed preset: authoring to a custom canvas is perfectly legitimate, so a frame's siblings are the only honest reference. It's what catches an import that never went through Normalize — a lone 1440×2560 frame among 320×512 siblings, which otherwise only shows up later as a character that balloons in the preview.
Retiming in bulk. A frame's duration is editable one at a time in the inspector, but the bulk bar carries its own Frame ms control — a field, a dial, and two buttons. = Set writes that duration onto every target frame; + Add offsets each frame's existing duration by it, negative to shorten. "Target" means your multi-selection, or every frame of the direction you're on when nothing is selected, the same fallback the Mirror, Enabled and Nudge controls use — so "put the whole cycle on 80ms" needs no selection at all. Durations are clamped to 1–9999ms, and when the clamp actually bites the toast says so rather than reporting a clean success over frames it flattened. The field deliberately keeps its value after applying, because retiming a cycle authored per side means applying the same number on the next direction tab.
What a smooth cycle can afford#
Beside the frame count sits a budget chip — 141 MB · 7.2 refreshes/frame — reporting the two
independent ceilings a cycle has to stay under. It turns amber when one of them is at risk, and its
tooltip says which. Both numbers are for the direction you're looking at, because only one
direction plays at a time.
Memory. The engine holds one image per frame and the browser holds the decoded pixels behind it.
Decoded size is width × height × 4 bytes — the PNG's file size is irrelevant, a 400 KB PNG of a
720×1280 sprite decodes to 3.5 MB. Measured on a 32 GB machine, a cycling set holds fine up to about
366 MB and falls off a cliff by 380 MB: past it the browser discards frames and re-decodes
them on every lap, which costs 11–12 ms per frame against a 16.7 ms budget and gets worse as the
cycle runs. That is the "it starts smooth and then stutters" failure. The ceiling is bounded by
bytes, not by frame count — 116 frames at 360×640 (102 MB) is comfortable, the same 116 frames at
720×1280 (408 MB) is not.
The chip warns well below that cliff, at 96 MB, on purpose: the browser sizes that cache from system memory, so a player's 8 GB laptop has far less room than the machine the ceiling was measured on, and two characters animating at once share it. If you cross it, 🔧 Normalize the direction down to your project's size class — a character is drawn scaled to the actor's height anyway, so authoring at the source video's resolution buys nothing but memory.
(The same cliff appears in the packaged editor: WebView2 and Chromium measured identically, so this is the browser's shared image cache, not something Ignitor or the desktop shell controls.)
Pace. Frame advancement accumulates real elapsed time, so on a 60 Hz display every frame ends up
held for a whole number of refreshes. When the effective duration — ms ÷ speed — isn't a multiple
of 16.7 ms, the hold length alternates and the cycle judders no matter how small the sprites are.
120 ms at speed 4 is 30 ms, or 1.8 refreshes: frames alternate between one and two refreshes, 44 %
off their authored duration. The same clip at speed 1 is 7.2 refreshes and drifts only 11 %, which
nobody sees — which is why the chip follows the drift, not exact alignment, and stays quiet on the
120 ms default. (That 120 is the duration a new frame is stamped with. A frame carrying no ms
at all — only possible in hand-written or imported JSON — is a separate question the engine answers,
and it holds for 100 ms; the editor reads the engine's number for those, so what a thumbnail says
is what the game plays.) Multiples of 16.7 ms are exact: 100, 83, 67, 50, 33, 17 ms. ms itself is a
whole number, so of those only 50 and 100 sit exactly on a refresh — the others are rounded
(83 standing in for 83.33) and drift well under a percent, which nobody sees either. When you want
the exact fraction anyway, author it as ms ÷ speed: 100 ms at speed 3 is 33.33 ms, two refreshes
to the digit.
A direction holding a single frame gets no pace verdict at all, and the tooltip says so. Judder is an alternating hold length, and a lone frame never advances — it's a static pose, not a cycle, so there is nothing for it to alternate between. That matters for idle poses, which are frequently one frame per side while their walk sibling is a hundred.
This ceiling is why a video import needs thinning as well as shrinking. A walk cycle reads well at 8–16 frames per side; 116 is video density, and at that density you need a frame duration so short that it lands between refreshes.
Thinning a captured cycle#
A clip captured from video or a 3D render almost never loops on its own. The last frame doesn't lead back into the first, so the cycle pops once per lap however good the individual frames are. Thinning is therefore two decisions, not one: which window to keep, and only then how many frames to keep inside it.
Find the window first. Step through the clip and look for the frame where the pose comes back around — same foot forward, same arm swing, same tilt of the head. That span is one cycle; what sits before and after it is a second, slightly different take of the same motion, which is why keeping "the first 40" usually still pops. Trim to the window, confirm the last frame flows into the first, and only then start dropping frames.
Then thin by a whole divisor of the window, so the spacing stays even and the wrap keeps working. A 40-frame window halves cleanly to 20 and again to 10; a 36-frame one gives you 18, 12 or 9. Dropping frames unevenly — pulling out "the boring ones" — gives the cycle a limp that is very hard to diagnose afterwards, because every frame in it looks correct on its own.
Matching a walk cycle to walk speed#
A walk cycle answers to a second clock: the character's Walk speed (walkSpeed, pixels per
second, in the Character Editor). The legs are animated in place and the actor slides across the room
on its own, so the two only agree when one full cycle lasts exactly as long as the actor takes to
cover one stride of ground. Too slow and the feet skate; too fast and the character moon-walks.
You can read the stride off the art itself. Step through the window and watch the foot that's planted on the ground: it drifts steadily backwards across the canvas, and how far it travels over the whole cycle is the stride, measured in sprite pixels. Scale that by the size the actor is actually drawn at — its Size adjust, the room's scale zone, any walkable-area size bias — and you have the stride in room pixels. Then:
walk speed = stride ÷ cycle duration
A stride of 147 room px with a 10-frame cycle at 50 ms — half a second a lap — wants roughly 295 px/s.
Run those same ten frames at 100 ms and the lap takes a full second, so the identical art now wants
147 px/s; leave the character at 295 and it covers twice the ground its legs are claiming. This is
also why thinning a cycle is safe but re-timing one isn't: halve the frames and keep the lap the
same length and nothing slides, but change ms and you have changed how fast the character may walk.
A room whose scale zone shrinks characters with distance changes their stride as they walk, while walk speed stays flat — so a cycle tuned at the front of the room skates at the back. The zone's Far Speed / Near Speed faders are the fix: set them in the same proportion as the zone's far and near scales, and an actor's speed tracks its size across the whole room.
Every frame carries: a sprite path, an ms duration, a mirror flag, offsetX/offsetY (drift
correction), scaleW/scaleH (squash/stretch), and an opacity (0 = transparent, 1 = opaque,
honored at draw time). Frames can be individually disabled — skipped by the previews, by export
and by the running game, without deleting them — reordered, multi-selected, copied to another
direction or even pasted across animations via an in-editor clipboard. A disabled frame is also
left out of the loop-start count, so the loop point stays on the frame you picked; disable every
frame of one side and that side degrades exactly as if it had no art (its mirror sibling, then the
nearest authored direction, then the static sprite).
Object animations carry one more per-frame field: rot, in degrees, spinning the sprite about
its centre. It composes with the hotspot's own authored rotation and with anything a token spun at
runtime, so a windmill or a swinging sign is a column of numbers instead of a folder of pre-rotated
PNGs — and unlike baking the angle in the ✎ Tweak modal, it never rewrites a pixel, so the art
stays at full quality no matter how many passes you make. The hit-test follows the rotation: the
cursor lands on the pixels you can see, not on the sprite's unrotated box. The field only appears
for object animations, because the hotspot sprite pass is the one place the engine reads per-frame
transforms — character frames rotate about the feet and interact with mirror, which are open
design questions, and room-layer and GUI animations read no per-frame field at all.
For character content, an Auto-stabilize control set bakes those per-frame offsets for you.
Auto-stabilize X and Auto-stabilize Y level the detected foot line across every frame in one
pass (or hold the torso still, for _walk/_run clips), and a 🦶 Foot-anchor preview toggle
pins the lowest opaque pixel to the ground dot so what you author matches how the engine plants the
character. It's all non-destructive — a per-direction Reset undoes the baked offsets — and
turning Foot-anchor off lets you dial baked offsetY by hand without the auto-pin fighting you.
Per-frame effect-token cues#
The inspector's Frame Events section is the authoring surface for core/animations.js's
fired mechanism: each frame can carry a list of effect-token strings (f.events), most commonly
SOUND:<id> for footstep/foley cues on specific walk frames, but any free token is accepted through
a + Free token button alongside the typed + Add SOUND picker (backed by the project's audio
ids). tickAnim() only emits these tokens into its fired array when playback crosses that
frame — it never executes them; the caller (the shell) dispatches them through the same
applyEffects() pipeline as every other effect token in the engine.
Loop points#
An animation's loop checkbox controls whether it holds on its last frame or wraps. When looping,
an optional loop start frame index splits the clip into a one-shot intro (frames 0..loopStart-1,
played once on entry) and a forever-looping sustain (frames loopStart..end, replayed from
loopStart every cycle) — visualized on the timeline as a badge on the first sustain frame, with
intro frames tinted differently. tickAnim() clamps a bad loopStart (NaN, non-integer, or
out-of-range) back to a valid index rather than trusting it blindly, and the editor mirrors that
same clamp live whenever you delete frames out from under a stored loop-start value.
Both settings are the animation's global default, and any single direction can disagree with them. Each side gets its own loop — Global, On or Off — and its own loop start, each inheriting the animation-level value independently until you say otherwise. A side carrying an override is marked with ⟲ on its tab, and the timeline, preview and sandbox all show the side you're looking at rather than the global setting, so what you see is what that direction will actually do. This is how you give one clip a walk that loops in three directions and holds in the fourth, without splitting it into two animations. Where the engine serves a direction by mirroring another, the authored side's override is the one that applies.
Related playback fields on the same flags bar: next (a follow-up clip to chain into when this
one finishes, or — random — to let the engine pick among a curated subset each cycle), hold
(a random ms range before advancing, active only on looping clips), settle (a walk→idle delay,
read only from the _idle clip), and speed (a playback multiplier, composable with a
per-instance speed on object hotspots). Every preview honours speed — the editor's own canvas,
the Preview Sandbox and the character editor's portrait player — so what you see is the pace the
game will run.
next works on object and room animations too, not just characters: a hotspot playing a
one-shot clip chains into its follow-up when the clip finishes, and a looping one chains at the
end of each cycle (or after its hold, when one is set). The — sequence — and — random —
forms behave the same way they do on a character.
One thing to watch when you pick a follow-up for an object clip: object and room animations are
keyed by their full name, with no entity prefix stripped off. The picker offers them that
way — grandfatherclock_ticktock, not ticktock — because that full name is the key the
engine looks up. If you have an older project whose next points at a short name the engine
can't resolve, re-pick it from the list and it will save the resolvable one.
Loop and loop start can also be overridden per direction: a compact control pinned to the right of the direction tabs (Global / On / Off, plus its own loop-start field) edits the active tab's side only — leaving it on Global inherits the header's values. A tab carrying an override wears a small ⟲ marker, so a side you overrode and haven't revisited stays visible instead of getting lost. Sparse by design: only sides you've actually touched store an override, everything else keeps following the global default.
Directions and mirroring#
Directional categories (character) author up to 8 direction tabs: the 4 cardinals are always
visible, and a diagonals checkbox reveals the 4 diagonal tabs (upleft/upright/downleft/
downright) — unchecked by default so existing 4-direction content looks exactly as it always has.
core/direction.js is the resolver behind this: DIR_MIRROR pairs up left↔right and each diagonal
with its horizontal sibling, so authoring one side of a symmetric pair is enough — at runtime,
resolveFrames() prefers an exact authored direction first, then falls back to drawing the
horizontal mirror sibling's frames flipped, and only after that degrades to the nearest authored
direction by angle. The editor surfaces the same mirror relationship directly: a Copy to row of
per-direction buttons duplicates selected frames across tabs (graying out the tab that matches the
current one, since copying to itself is a no-op), and a per-frame mirror checkbox flags a frame
to be drawn horizontally flipped from its stored art.
Preview and playback#
The right-hand preview panel plays the selected animation/direction combination live — Play, Loop, Flip facing, a scrub bar, onion-skinning, pivot markers, and zoom/pan. It draws the sprite and its backdrop with the same filtering your game uses, so a pixel-art project previews crisp instead of softer than what ships. Zooming re-renders the frame rather than magnifying what was already drawn, so high-resolution source art keeps its detail as you go in — and a 1:1 button jumps straight to the zoom where one pixel of the source PNG covers one pixel of your screen, which is the zoom you want before retouching anything. 1:1 also re-frames: it recentres on the frame's own art instead of carrying your current pan over, so it lands on the same view every time no matter where you had scrolled to — at that zoom the canvas is several times the panel, and an inherited pan would leave the character off-screen. If a sprite is too tall to reach 1:1 within the zoom range, the button says so rather than stopping quietly short. A Preview Sandbox button opens the movable comparison modal (shared with the Character Editor's own ▶ animation preview) for checking a clip's scale and timing against another character or a live game background. With — blank floor — picked it plays the clip on a plain floor at the project's resolution; pick a room and the clip plays inside the real game frame instead — the room in its viewport, walk-behinds, depth effects, parallax layers, light zones and the project's actual main GUI bar, each one a toggle. That's where you check that a walk cycle passes behind the counter it's supposed to pass behind, and that the character isn't half-eaten by the verb bar, before ever launching the game. The readout keeps the clip's on-screen height and the walkable area scaling it, so the sizing numbers don't go away when you drop it into a room.
A TWEAK mode switches the same canvas into a per-frame editor, and it holds two kinds of edit. Pixel tools — pencil, eraser, bucket, eyedropper, magic-erase-by-color, a clone stamp (hold Alt and click to set the source it copies from), and a select tool that drags a rectangle you can then Crop, Fill or Erase — retouch the art directly; the brush tip can be round or square and is outlined under the cursor so you see its footprint before you commit. Geometric transforms reshape the whole frame: mirror horizontally/vertically and rotate 90° clockwise/counter-clockwise are instant, while scale and warp open an interactive handle workspace — scale drags an eight-handle box (aspect-locked by default, or single-axis from an edge); warp drags the four corners of a quad, plus free rotation and skew — over a checkerboard backdrop so you can judge the edit against transparency. Everything shares one undo/redo stack, and nothing touches the real PNG until an explicit Save writes the edited frame back to the asset file — nothing here is destructive until that save.
Because a single PNG can back more than one frame or animation, TWEAK guards against clobbering a shared sprite: before it commits an edit to a file that other frames also use, it warns you and lists exactly which animations share it, so you never silently rewrite art out from under another clip.
In practice you should rarely see that warning on frames you added yourself, because every way of adding a copy of a frame gives it its own PNG: ⎘+ Duplicate, Paste, and the Copy to direction arrows all stage a physical copy of the image and point the new frame at it. So retouching frame N+1 leaves frame N alone, and painting an earring onto the right-facing frames doesn't reach the left-facing ones. Inventory items are the one exception — an item's sprite is a single file by definition, with no per-frame slot to copy into, so item frames still share.
The warning is therefore about art you inherited: two animations pointing at the same file
because a hand-edited animations.json, an older project, or a deliberate reuse put them there.
When it fires, it names the animations involved, so you can decide whether the edit is meant for
all of them.
Waiting for that explicit Save would leave your strokes with nowhere to live, so TWEAK keeps a working copy of every unsaved frame on disk, refreshed a few seconds after you stop painting. It never touches the artwork — it's scratch, kept aside and thrown away the moment you Save the frame. If the editor closes, crashes or reloads while frames are still dirty, reopening that animation offers to restore the unsaved tweaks, and taking the offer puts you back in TWEAK with the strokes intact. The same safety net covers the case where something else rewrites a file you were painting on — a re-import or a normalize over those frames: your strokes are kept and a warning tells you they're now out of sync with what's on disk, so you can look before you save over the newer version.
Undoing#
The editor keeps one undo history for the work itself — ↩ and ↪ in the toolbar, or
Ctrl+Z and Ctrl+Y (Ctrl+Shift+Z works too), on Mac with Cmd. It covers the edits that used
to be one-way: frame offsets, mirroring, reordering, per-frame cues, and deleting or renaming a
whole animation. Fifty steps are kept by default, and you can raise or lower that in
Hub Config if you'd rather trade memory for a longer memory.
Two things are worth knowing. Saving clears the history — once an edit is on disk, the editor stops offering to walk back past it. And undoing something that moved files around deliberately cuts the redo branch, rather than leaving you a "redo" that would have to recreate a file that no longer exists.
Workflow#
- Pick a category (and, if applicable, an entity) in the left rail, then + New Anim — character and GUI anims compose their key from pickers, never free text.
- Add frames: drag/drop PNGs, duplicate existing frames, or run an MP4 Import with chroma keying.
- Tune per-frame ms, mirror, offsetX/Y, and scaleW/H in the inspector; attach
Frame Events (
SOUND:cues or free tokens) on the frames that should fire them. - Set the clip's loop, optional loop start, next, hold, and speed.
- For directional (character) content, author the cardinals first; turn on diagonals only for directions that need their own art — mirrored siblings are free.
- Check timing and alignment in the preview panel, switching to TWEAK mode for pixel-level fixes.
- Save to write the project's
animations.json.
Save merges; it does not overwrite.
animations.jsonis written by more than this editor — the Room editor's 🎬 Send to animation, the Character editor's twin button and the FX bake all add entries to the same file. Saving here posts the registry this tab read plus what you changed, and the server folds the two together: animations that appeared while your tab was open are kept (a toast says "kept N anim(s) created elsewhere" and the list refreshes to show them), and animations you deleted stay deleted. The one case it can't reconcile is two editors changing the same animation at the same time — there, the last Save wins.The editor owns the DATA, never the ENGINE.
core/animations.js's own header comment says it plainly: this file is "hand-maintained engine logic ONLY — the editor never regenerates it." Saving here only ever posts to/save-animations, which writesanimations.json; the frame advancer (tickAnim()), the registry accessors, and the resolution cascade inresolveFrames()all live in hand-written JS that no editor button touches. If you need new playback behavior — a new loop mode, a new fallback rule, a new thingfiredcan carry — that's a manual edit tocore/animations.jsitself, not something achievable by clicking around this tool. Everything the editor's UI controls (frame lists, timing, loop points, mirror flags, events) is DATA that flows through that unchanged engine code.